Tuesday, October 26, 2010

DAB-Pooh and Friends

Yet more Disney pages!  Today, I finished Pooh and Friends.  Pooh is very basic.  I cut Pooh(3) out of SU black for the base, Crushed curry for the 'skin,' and I think the red for the shirt came from CM, but I'm not sure.  I keep my SU paper separate for easy matching when I am making a card (I have all the pens, a bunch of ink, some ribbon and patterned paper).  The rest of my solid paper I keep in a drawer, sorted by color, so forgive me if I don't always know exactly what color and brand I used.  As usual, I cut an extra nose for dimension.  The background paper has little bees on it and came in a CM Pooh pack years ago.  I had one sheet left and needed four, so I scanned it with my printer and made copies-not perfect, but it worked.  The photo mat is sized for a 6x4 photo and is just the black and crushed curry layered. The signature box has an added layer of white and I have been using my mega stack of GP from Sam's Club.  I cut "Pooh" at fit to length the size I wanted for the page (can't remember what it ended up being).


Tigger wasa little more involved. Last year, I wanted him to "bounce" on the page so I made him a slider, adapting a technique I'd seen on DIY's old scrapbook show. The kids love to bounce him and so the slider bent quickly. I learned from my mistake. This year, I used two layers of the heavy-duty SU basic black for the slider. I thought about using chipboard but thought it might be too heavy. I cut four strips at about 1 inch by 6 inches and glued two together, on top of each other. Then I laminated them.
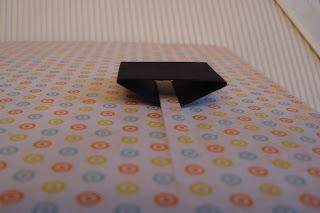
I chose my background paper from the DCWV citrus stack and I made two parellel slits, about a 1/4 of an inch apart, along the side of the paper where I wanted to place Tigger. They can't go all the way to the end of the paper.  I also put a 1 1/4 in slit perpendicular to the lines along the top.  Last year, I let my slider come out the top of the page and it stuck up too far, so this time I made it come up through the page and it is perfect-up enough to grab, not sticking out really far.

Then I cut a 1in by 3in strip of the black and used my Martha Stewart score board (bought with the 50% Oprah coupon) for the first time.  I scored at 1/2in, 1 in, 2in and 2 1/2 and bent like so:


Then you put the feet through the slits so the two 1/4 in pieces are on the back of the paper.
Back:
 Front:
Heavy duty adhesive is important. On the back, adhere the 1x6 laminated strip, trimming to fit the page as desired.  Then pop the top up through the slit. I added the SU tab punch to make it easy to pull.  Then adhere Tigger and pull him so he "bounces" up and down!


Of course, the noses are all double-layers. I just used rectangles for the autograph boxes-saving the fancy ones for the princesses.  Piglet is simple, too. His background came from DCWV summer paper stack.  All his pinks are SU: pink pirouette, pretty in pink and regal rose.


 Eeyore is a little more interactive again. Being true to the story, Eeyore's tail always falls off. So I used a magnet to make it removable.  I really like the thin Basic Grey magnets but they were too big for the tail.  I did use the thin one under Eeyore and the thicker but smaller one under the tail.  Not sure what colors I used and Eeyore was cut at 3 in-in retrospect, he could have been a little bigger.


Background paper is more DCWV Citrus stack. If you are interested, this is the magnet packaging. The Basic Grey ones are obviously designed for scrapbooking and came from my local scrap store. The others are thicker and came from Walmart.


As always, thanks for looking.

Monday, October 25, 2010

Grad School Poster Project

Last week we had to do a poster presentation for my nursing theory class.  It was a little like 8th grade science fair, where you stand in front of your project while people- in this case, the faculty and other classmates-wander around looking at the posters and asking questions.  I felt a little nauseated but I think it went okay.  I don't have my grade yet but people were impressed with my "professional" lettering and medical icons.  I used the cricut every day paper dolls cart.
I uses Real Dial Size to get the stethoscope, syringe and bandaid large enough.  The nurse was cut at 7 inches.  The letters are from PS.  Paper is Deep Blue and Raspberry from CM, the nurse's scrub top was from an old CM pink pack. The bandaid is CM french vanilla, stethoscope SU basic black and DCWV metallic silver, syringe CM white and DCWV metallic silver. Thanks for looking.

Saturday, October 23, 2010

DAB-Paper Packs and Snow White

I keep mentioning the Mickey and Princess paper packs I bought at Michael's and have been using a lot for these books, so I figured I'd take a picture so you'd know what I am talking about.
And of course, I didn't use them on the Snow White pages!  I used DCWV shimmer stack for the solid colors, DCWV Glitter pack for the white in her dress and DCWV Nana's Nursery Girl for the background pages.  Snow White came from the princess cart and the frame came from Cindy Loo.  I had NO intention of buying Cindy Loo but those enablers on the cricut messageboard kept going on and on about the frames!  And I do think this frame goes perfectly with Snow White and the background paper.


Again, I drew in the eyes and added the white to the mouth with the signo pen.


Friday, October 22, 2010

Keene Pumpkin Festival

Last Saturday, Flat Stanley went to what will probably be the last Keene Pumpkin Festival.  At one point, Keene held the World's Record for most lit jack o'lanterns in one place but as the festival became more popular, it earned some competition.  It's hard for a place like Keene to compete with a giant city like Boston.  I had to work, but Nat took Natalie and Stanley and despite the cold, they had a great time.
This will be our last weekend with Flat Stanley. On Monday, we will get him packed up and sent home to Carlos.  I do want to take him to the State House first, though.

Tuesday, October 12, 2010

DAB-Sleeping Beauty

Still working on my DAB and I need to pick up the pace. We leave in a month and the only pages that are done are the few I have posted on the blog!  This week's challenge on the cricut circle blog called for pink, glitter, and ribbon and that fit nicely with my idea for Sleeping Beauty, so I jumped ahead and did her, even though I had been working on Toy Story.


  I used Aurora 3 from Happily Ever After,  cut at six inches. The hands were tough, but I knew I would be covering them with the ribbon rose. The ribbon rose is 1/4 in SU pretty in pink grosgrain ribbon with a pink gem in the center (brand unknown).  The dress was cut from DCWV glitter paper.  The flesh tone is vanilla from CM, not sure where the yellow paper came from, or the red lips.  I did cheat on the lips and the center is done with the signo white pen.  The shiny gold is from CM.  I cheated on the eyes, too. What I do is cut out a second face, from white, then use the white pieces to glue in for the eyes and then draw them on.  Her title was cut at 2 inches using the shadow base/icon and the layers:flesh/hair.
For the spot for the autograph and the photo, I used the marquee2 off Storybook, cut at 3 1/4 for the autograph spot and 6 for the photo mat.  I then layered it with the accent/frame.  I did not tack down the frame on the photo one, I will first put my photo down.  Background paper is from the ek success disney princess pack I bought at M's.  Unfortunately, there is a color variation from the first pack I bought and it is pretty obvious in this layout.  Also, the pack comes with only 1 sheet of each pattern, so I needed four packs at 5.99, but I bought them with the 40% off coupons, so it's okay!
Then I had to make one in blue for my niece.  For this, I used Aurora4 at 6 in, with her dress cut from the DCWV Holiday stack from last year, all other paper the same, same cheats for the mouth and eyes.  The background paper is from the DCWV Nursery Boys stack. I skipped the ribbon, since this wasn't for the contest, and just used rectangles sized to mat a 6x4 photo. I used a CM corner shaper.
I didn't put adhesive under the part of Sleeping Beauty that overlaps the photo mat so that when the time comes, I can slip the picture under her dress and hand.
As always, thanks for looking!

Saturday, October 9, 2010

Loving the Happy Hauntings Cart!

I absolutely love this cart, especially the font.  I have so many spooky plans.  I started to decorate the treat bags for my daughter's class. There are only twelve kids and I am keeping it simple, but each kid will have a different bag.  My daughter is picking the characters and colors, so that it why there is so much pink.
I put glitter in Mrs Frankenstein's hair and used a jewel to accent the witch's eyes. 
The layers on this cart are like the Create-a-Critter layers so that you don't have to cut out tiny, tiny pieces.  I love the way the eyes look rimmed in black and I am so glad I didn't have to cut out the whites like on the Disney princess carts.
I love the skeleton and I used jewelled eyes on the bag but I think that for a layout I am going to try the glow-in-the dark glitter on the skeleton.  We made some of the glow-in-the-dark ornaments and I loved the way they came out, but my daughter ended up breaking them already because she kept picking them up to take them into the closet so she could see them in the dark.  

At the pumpkin patch with Flat Stanley

Friday the weather was gorgeous-blue skies, nearly seventy degrees.  Just perfect. So we took Flat Stanley to pick out a pumpkin.

Friday, October 8, 2010

Flat Stanley

We are having a great time with Flat Stanley.  He arrived Monday. Tuesday we took him to the mall since Natalie needed a new fall wardrobe (we had summer, we had winter, but nothing perfect for our beautiful fall weather).  We met up with my best friend and took FS out to dinner at the Longhorn.
Then Wednesday, FS got to come to school:


And after school, he went to gymnastics class:

Thursday, he went to dance class and then to college! But I forgot the camera.  Where will he go today?

DAB-Ducks and Dogs

Loving how my autograph books are coming out, but it is slow going!  I need to speed it up if they are going to be done in time for our trip.
Here are the ducks-Donald and Daisy:


Background papers for Donald are from the M's Disney paper pack.  Daisy's papers are from the DCWV glitter stack.
Pluto's papers are from DCWV pet stack.  Characters, names, bone and paw print came from the M&F cart and the signature boxes for the ducks are Nestabilities dies.


I pop-dotted Pluto's ear and nose for added dimension.  Thanks for looking!


Monday, October 4, 2010

Flat Stanley came today!

Flat Stanley came today!  He was accompanied by a sweet note and a great picture from Carlos in Mrs. Butler's class.  Natalie was super excited and posed in front of the house with him.


Then she insisted that we make Flat Stanley his own bed to sleep in.
I think he likes it!
Thank you to the second grade class for sharing Stanley with us.  We have some great adventures planned!

Thursday, September 16, 2010

DAB-Mickey and Minnie

As I have said, I have to make two autograph books, one for my daughter and one for my niece.  My daughter loves pink, my niece blue, so I have made each book a little different.  It keeps me from getting bored and gives them some individuality.
So here are Mickey and Minnie:

Mickey was cut at 5.5 from M&F.  The background paper came from an EK success paper pack, cut down to 8x8.  The Mickey hand brad came from The Finished in a Flash Disney kit.  The black rectangle is sized to mat a 6x4 photo and the mickey head has a white circle for the mouse's autograph.

My niece's page still needs the white circle for the autograph. These background pages came from an 8x8 disney pack bought at Micheal's.  Both Mickey's were made with SU basic black for the outline, CM yellow for shoes, CM french vanilla for face, CM white for buttons and eyes and CM red for shorts.  All the mice-Mickey and Minnie-have pop-dotted noses.

Minnie is a little more stylish than Mickey.
Her background paper is from the Disney Mickey and Friends 8x8 papers by Hot off the Press. the speckled blue is from an old CM pack Shades of Blue.  The skirt and bow are double-layered for depth. The corners were done with a CM corner shaper, forget the name.
And of course her head has an added bow, also double layered.  I used Fit to Length to size the word Minnie becuase I was too lazy to start up Design Studio to see how long it would be at what size and I forget what size ended up working.

My daughter's Minnie is in the more traditional pink and polka dots, except I didn't have polka dot paper with tiny enough dots.  So we made our own.  The pink is SU Regal Rose and I used their whisper white ink and Itty Bitty Backgrounds to stamp dots, then sprinkled the wet ink with dazzling diamonds for a little sparkle.  The skirt and bow are doubled here for dimension, too. Her spot to sign is a heart from doodlecharms because my daughter wanted Minnie to know how much she loves her! These background papers came from the same Michael's 8x8 pack.
Here is a close up of some of the detail in Minnie's dress:

Wednesday, September 15, 2010

DAB-Chip

Like all the other Cricut fans, I didn't get much done yesterday.  The Imagine launch was too cool.  Watching the demos on HSN made me want one even more and the bundle price was a great deal, but $500 on a new cricut machine was just not in the budget now.  I consoled myself by working on my disney autograph books (DAB).  Here is the Chip page to match Dale.  I darkened the body color and used CM Brown rather than SU Close to Cocoa.  Chip is the same size as Dale.  I used SU Garden Green and Old Olive for the oak leaves, which were cut at 2 1/4 from the M&F cart.  The tree branch is elevated on foam tape, as is Chip. the branch was hand cut. Lots of dimension again. 
If you look closely, you can even see the texture on the DCWV paper.


And here they are together: