Tigger wasa little more involved. Last year, I wanted him to "bounce" on the page so I made him a slider, adapting a technique I'd seen on DIY's old scrapbook show. The kids love to bounce him and so the slider bent quickly. I learned from my mistake. This year, I used two layers of the heavy-duty SU basic black for the slider. I thought about using chipboard but thought it might be too heavy. I cut four strips at about 1 inch by 6 inches and glued two together, on top of each other. Then I laminated them.
I chose my background paper from the DCWV citrus stack and I made two parellel slits, about a 1/4 of an inch apart, along the side of the paper where I wanted to place Tigger. They can't go all the way to the end of the paper. I also put a 1 1/4 in slit perpendicular to the lines along the top. Last year, I let my slider come out the top of the page and it stuck up too far, so this time I made it come up through the page and it is perfect-up enough to grab, not sticking out really far.
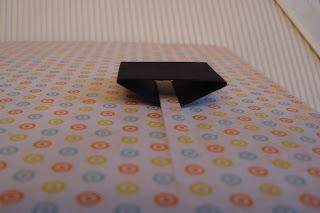
Then I cut a 1in by 3in strip of the black and used my Martha Stewart score board (bought with the 50% Oprah coupon) for the first time. I scored at 1/2in, 1 in, 2in and 2 1/2 and bent like so:
Then you put the feet through the slits so the two 1/4 in pieces are on the back of the paper.
Back:
Front:
Heavy duty adhesive is important. On the back, adhere the 1x6 laminated strip, trimming to fit the page as desired. Then pop the top up through the slit. I added the SU tab punch to make it easy to pull. Then adhere Tigger and pull him so he "bounces" up and down!
Of course, the noses are all double-layers. I just used rectangles for the autograph boxes-saving the fancy ones for the princesses. Piglet is simple, too. His background came from DCWV summer paper stack. All his pinks are SU: pink pirouette, pretty in pink and regal rose.
Eeyore is a little more interactive again. Being true to the story, Eeyore's tail always falls off. So I used a magnet to make it removable. I really like the thin Basic Grey magnets but they were too big for the tail. I did use the thin one under Eeyore and the thicker but smaller one under the tail. Not sure what colors I used and Eeyore was cut at 3 in-in retrospect, he could have been a little bigger.
Background paper is more DCWV Citrus stack. If you are interested, this is the magnet packaging. The Basic Grey ones are obviously designed for scrapbooking and came from my local scrap store. The others are thicker and came from Walmart.
As always, thanks for looking.


your pages are really really cute...TFS!!!!!
ReplyDeleteThese pages just rock! Thanks for the tutorial!
ReplyDelete